1.1 Release Users / Developers Guide
Copyright © 2003 Gauthier Services Limited
Abstract
This document provides a straightforward users guide for developing and maintaining applications using WARFARE. There is also some information relating to extending the framework to support access to alternate data sources and to enable developers to extend the basic functionality of the system.
Table of Contents
WARFARE loosely follows a Model View Controller architecture with a simplified template language providing the display component a View Manager coordinating the transitions between views and a number of View Objects providing data access.
The templates can be utilised in both a push and a pull mode where a template can be called which will pull various views which in turn push their output through other templates for inclusion in the page. Alternatively a simplified ViewImport servlet can be called which will just call one view which will just push output to an appropriate template which has been developed to allow easy inclusion of views into a jsp page.
A JSR-168 Compliant Portlet is also available to enable inclusion of WARFARE views into a Portal Server.
A View is defined as a single operation on a data source or a method to request information from a user. In the basic operation of WARFARE there are three types of view, an input view, and update view and a query view. Standard extensions have been added to interact with SQL data sources and edit a files on the server. Views are owned by a single group and only members of that group will have visibility of that view.
A View is associated with a layout which will define the section template to display the data within and optionally a record template for each record in a results set, or a record template for the user to input data to. A server template is also specified for each layout where error codes from updates or queries can be be displayed to the user or other information if an action fails.
A view can perform one of three opperations
- query
A single view can use a DAO to aquire information from a specified datasource, either a file, database or JMSQueue. This information will be converted into a n array of Data Transfer Objects (DTOs) that will are passed to the display class specified by the layout. The display class will then render the information to be displayed.
- update
A View can take information either from a user request or another view and use the values to update a specified datasource.
- input
An input view is only used to generate a form to be displayed for obtaining user input.
Views are linked together in three main ways, normal links, in-line links and chained links.
- Normal Links
A normal link will allow information submitted or altered on one page to be submitted via a form post to another view to either run a query or update the data source. This is how an input view can be used to obtain information and pass it into an update view to create a new record or pass data into a query view to search the data source and display the results. Results views can also be linked in this way to allow the retrieved information to be edited and passed into an update view to either update the data source or delete the record.
- Chain Links
A chain link can be used to pass the same information to more than one update view one after the other or from an update view into a query view to see the results of the update or insert into the data source.
- In-line Links
An in-line link can be used between query views to find information related to the current record from another view and include it in the current page section.
A VHTML pull template is a simple HTML based template that can be used to pull other views into a single page for a user to interact with. This is commonly used to enable groups of related views to be presented to the user in one go in a manner similar to a portal server.
The security model is based around users and groups with each view belonging to a group and only users who are members of that group having access to that view. A user also belongs to a group which is that users primary group. A users user id and primary group id are passed with every query into the system as VMUID and VMGID which can be utilised if required to restrict access to data belonging only to that user or that users group.
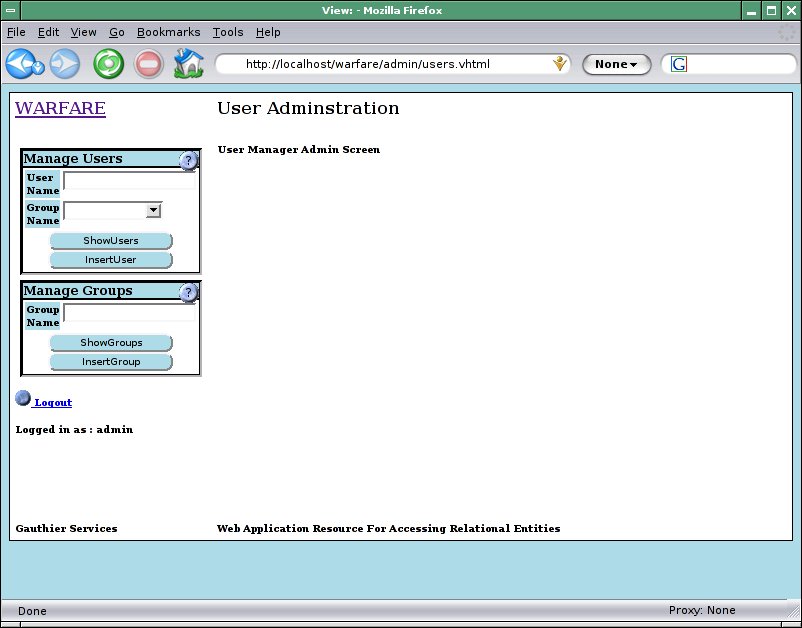
Users can be created from the useradmin.vhtml page in the deployed application by simply typing the user name in the username field in the Manage Users section, selecting the primary group for the user and clicking on the button. This will take you to the User Detail Screen
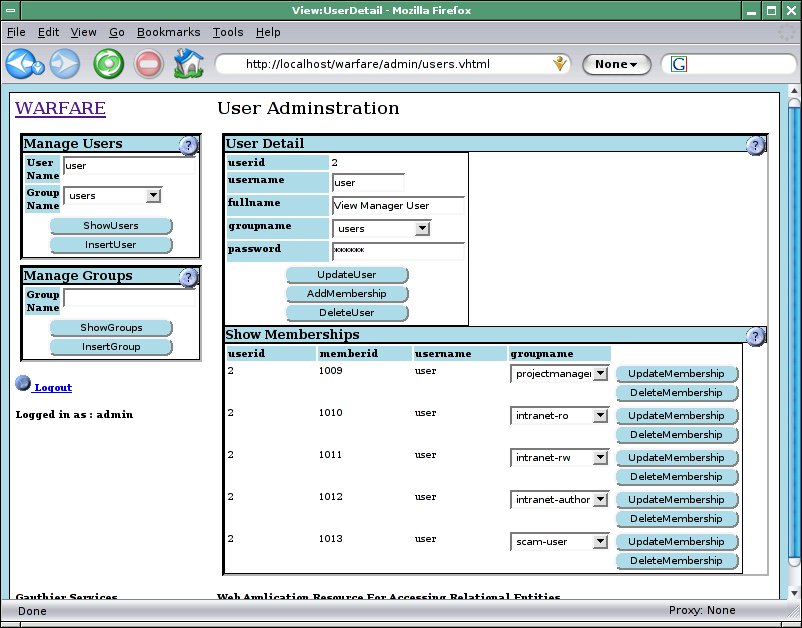
On the UserDetail screen you can add extra details for the user, change the primary group and set their password. You can also at this stage add additional group memberships for this user by clicking the button.
When a user is a member of additional groups these will then be displayed on the User Detail screen. The groups to which a user belongs can be changed and updated by clicking the button or deleted by clicking on the button.
You can also search for users by entering in the username or partial username with % characters for wildcards in the username field in the Manage Users section and clicking the button. You can restrict the search to specific groups using the pull down box, or by selecting NONE search all groups for matching users. This will display a list of all matching users with a button which will link to the User Detail Screen for that user.
Groups can be created by entering a group name in the groupname field in the Manage Groups section field and clicking the button.
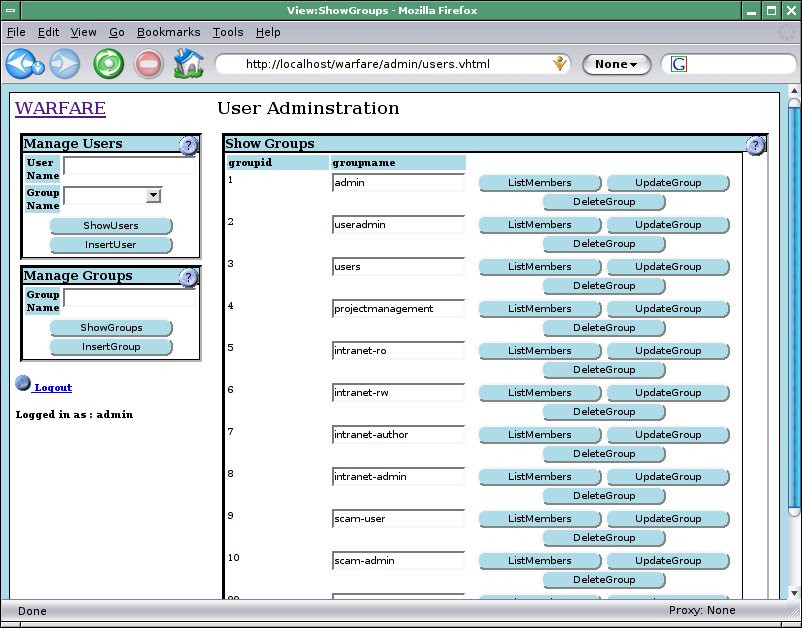
The show groups screen allows you to can edit the group name, list all members of a group or delete the group.
For each of the Data Access methods that are available to WARFARE a connection needs to be configured in the viewmanager.properties file. This file is located in the WEB-INF/classes folder of the webapp.
Each DAO also has different requirements for the templates and other parameters that can be passed to it.
The SQLDAO requires a JDBC database connection, which can be configured in one of two ways. Container managed pools should be used in preference where available as most servlet containers have more flexible configuration available than has been implemented for the application managed pools. Application managed pools however can be used in virtually all containers without needing to alter the configuration of the server to create completely self contained web applications.
You should first configure a DataSource in your application server. The method of doing this is beyond the scope of this document but should be covered by the documentation for your application server. The minimum requirement is that the DataSource is made available to the WARFARE web application via the JNDI tree. This will nearly always involve installing the jar file containing the driver for the database you are connecting to into your application server. This may involve adding to the CLASSPATH in the startup script but most application severs have a better way of installing external libraries such as placing the jar files in to an ext directory or common/lib directory as in the case of Tomcat.
The web-application now needs to be configured to see the JNDI data source. The first place to configure this is in the web.xml file in the WEB-INF directory of the web application where you will need to add the resource references to the JNDI data source.
Example 1. Resource references in web.xml
      <resource-ref>
      <description>
	Link up to the jdbc/pm data source
      </description>
	<res-ref-name>
	  jdbc/pm
	</res-ref-name>
	<res-type>
	  javax.sql.DataSource
	</res-type>
	<res-auth>
	  Container
	</res-auth>
      </resource-ref>
|
Finally the View Manager configuration needs to be made aware of the JNDI data source. This is done in the viewmanager.properties file. The connection name that is used to reference this data source in the views configuration is appended by a .log to specify a log file for this data source and by a .driver used to specify that this is a JNDI DataSource.
Application managed pools are orders of magnitude easier to set up which indicates how much simpler and less resilient they are but if you have no choice then its better than nothing. They are entirely configured within the viewmanager.properties file. You will need to specify the jdbc driver name, the URL to connect to the data base, username, password, a log file and the maximum size to allow the pool to grow to.
Example 3. Configuring an application managed DataSource in viewmanager.properties
      pm.driver=org.postgresql.Driver
      pm.url=jdbc:postgresql://localhost:5432/pm
      pm.username=nomad
      pm.password=
      pm.log=/var/tmp/pm.log
      pm.maxpoolsize=10
|
You will also need to place the jar file containing the relevant driver into the WEB-INF/lib directory of the web application if you are planning on creating a completely self contained web application. Otherwise the driver will need to be added to the CLASSPATH of the server as with container managed connections.
A query template for the SQLDAO should be used to construct an appropriate SELECT statement to obtain the information you want from the database. <%prop ... %> tags should be used to substitute values in the select statement.
An update template can be used to to construct appropriate UPDATE, DELETE or INSERT statements to update information in the database.
The JMSQueue DAO allows you to retrieve messages from a JMS Queue and view them within WARFARE. The configuration for a JMSQueue can either acknowledge the messages and therefore remove them from the queue or not acknowledge them and leave them on the queue. Messages can also be retrieved in a raw state or processed as XML before translation into a DTO to be displayed by WARFARE.
A JMS Queue connection is configured within the viewmanager.properties. You will need to specify the context provider, context factory, the jms connection factory, a queue name, and whether to acknowledge the messages once displayed. The following example shows hte properties needed to connect to an OpenJMS queue.
If no query template is specified the raw text content of the message will be placed into a single field named messagedata and passed back to WARFARE.
If a template is specified it should be an XSLT template that can be applied to the text content of a message. The expected result of the transformation is a seriese of elements with any required information represented as attributes. Each element will be passed back to WARFARE as a separate DTO to support messages that may contain more than one data object.
Update templates are used to construct the message to post. The template should be a normal WARFARE template and make use of <%prop ... > tags to insert values into the template. The output of the template will be posted as a TextMessage on to the specified Queue and need not be XML.
The JMSTopic DAO allows you to retrieve messages from a JMS Topic and view them within WARFARE. WARFARE will register its' self as a durable subscriber to the topic to make sure that any messages that are sent to the topic will be available for future retrieval. The configuration for a JMSTopic can either acknowledge the messages and therefore remove them from the queue or not acknowledge them and leave them on the queue. Messages can also be retrieved in a raw state or processed as XML before translation into a DTO to be displayed by WARFARE.
A JMS Topic connection is configured within the viewmanager.properties. You will need to specify the context provider, context factory, the jms connection factory, a topic name, the name of the subscriber you wish to subscribe as and whether to acknowledge the messages once displayed. The following example shows hte properties needed to connect to an OpenJMS topic.
If no query template is specified the raw text content of the message will be placed into a single field named messagedata and passed back to WARFARE.
If a template is specified it should be an XSLT template that can be applied to the text content of a message. The expected result of the transformation is a seriese of elements with any required information represented as attributes. Each element will be passed back to WARFARE as a separate DTO to support messages that may contain more than one data object.
Update templates are used to construct the message to post. The template should be a normal WARFARE template and make use of <%prop ... > tags to insert values into the template. The output of the template will be posted as a TextMessage on to the specified Topic and need not be XML.
The File DAO allows you to edit files on the server and save the file again in a different place if required.
Connections for the FileDAO is configured in the viewmanager.properties file. You need to specify the location to save the edited files back to on the server.
When querying files the template parameter is not used to specify a template to be used. The template parameter instead specifies a field from the post data to be used as a file name to be edited. An example from the ViewManager application sets the daotemplate to getidtmpl for the EditGetIDTmpl view to used the value from the getidtmpl field as a file name to edit.
The Lucene DAO allows you to query and update a Lucene Index. Lucene provides a very fast and lightweight text index to enable Google like searching for you application.
The location of a Lucene index and other configuration options is specified in the viewmanager.properties file.
The template for a lucene search should be used to construct an appropriate query to be passed to a QueryParser. <%prop ... %> tags should be used to substitute values in the search statement.
The XMLFile DAO allows you to query XMLFiles on the server and update them using XSL Templates.
Connections for the XMLFileDAO is configured in the viewmanager.properties file. You need to specify the location of the file and the location to save the file back to.
When Querying XML files the template specified is expected to be an XSLT. The template is first passed through the internal template parser to substitue any parameters. The XSLT should output a flat set of elements with all required values represented as attributes.
Example 16. An XSLT to query an XML File
<xsl:stylesheet version="1.0"
       xmlns:xsl="http://www.w3.org/1999/XSL/Transform">
  <xsl:output method="xml" version="1.0" indent="yes"
  standalone="yes" encoding="utf-8"/>

  <xsl:param name="search"><%prop name="Surname" default="Doe"%>
     </xsl:param>
  <xsl:template match="//Address">
  </xsl:template>
  <xsl:template match="//Address[Surname=$search]">
  <Address id="{@id}" FirstName="{FirstName}" Surname="{Surname}"
    Street="{Street}" PostCode="{PostCode}"/>
  </xsl:template>
  <xsl:template match="//Addresses">
  <Results>
  <xsl:apply-templates/>
  </Results>
  </xsl:template>

</xsl:stylesheet>
|
When Updating XML files the template specified is expected to be an XSLT. The template is first passed through the internal template parser to substitue any parameters.
Example 17. An XSLT to update an XML File
<xsl:stylesheet version="1.0"
       xmlns:xsl="http://www.w3.org/1999/XSL/Transform">
  <xsl:output method="xml" version="1.0" indent="yes"
    standalone="yes" encoding="utf-8"/>

  <xsl:param name="search"><%prop name="id" default="2"%>
      </xsl:param>
  <xsl:template match="Addresses">
    <xsl:copy>
      <xsl:apply-templates/>
    </xsl:copy>
  </xsl:template>

  <xsl:template match="//Address">
    <xsl:copy-of select="."/>
  </xsl:template>

  <xsl:template match="//Address[@id=$search]">
    <Address id="{@id}">
      <FirstName><%prop name="FirstName" default="None"%></FirstName>
      <Surname><%prop name="Surname" default="None"%></Surname>
      <Street><%prop name="Street" default="None"%></Street>
      <xsl:copy-of select="Town"/>
      <xsl:copy-of select="County"/>
      <PostCode><%prop name="PostCode" default="None"%></PostCode>
    </Address>
  </xsl:template>

</xsl:stylesheet>
|
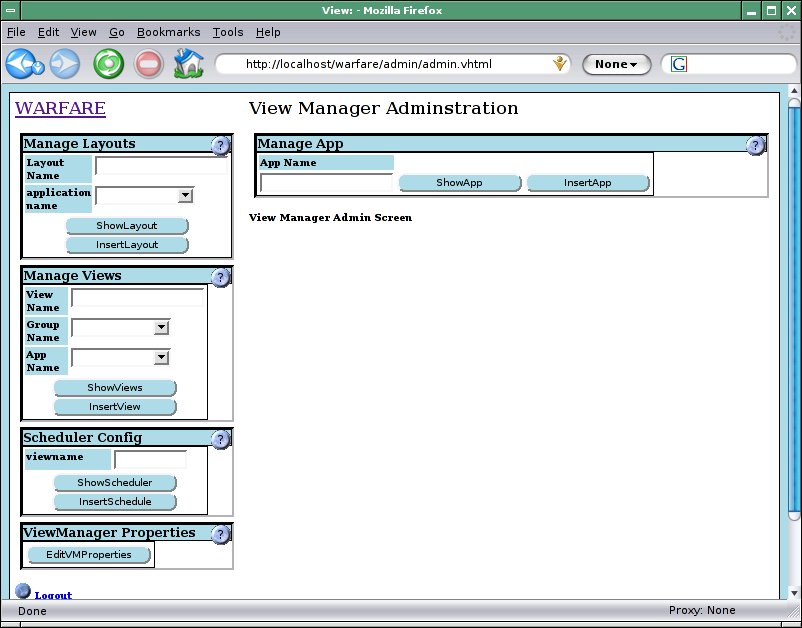
Creation and administration of Applications, Views and view components is performed via the admin.vhmtl screen. There are three main sections: Manage Apps, Manage Views and Manage Layouts.
The Manage App section is to configure applications which are used to logicaly group Views. The Manage Views section is for searching for views and creating new views. The Manage Layouts section is used for searching for and creating Layouts.

You can search for an exesiting application by entering its name in the App Name Text box and clicking on the button % can be used as a wild card if you dont know the full name. You can then update the application details displayed on the screen and click the button to update the details in the database. You can also click the button which will remove this applications configuration from the database. This will PURGE all Views and Layouts associated with this application from the database as well.
You can create a new application by typing the new name from the application into the App Name Text box and clicking on the button. This will create a new application and then display a screen to allow you to update the details for the application.
When you have an application with many views associated with it you can generate an XML Export file of the application and all it associated views and layout by clicking on .

If you wish to maintain an existing view then you can enter a view name in the View Name field (using % characters as wildcards) and select the group and/or application that the view belongs to (or NONE if you don't know) and clicking on the button. This will list all Views matching your search criteria. If you click the button next to the view that you are interested in you will be taken to the View Detail screen where you can maintain the view.
A view can be created by typing a new view name into the View Name field, selecting the group that the view should belong to and clicking the button. This will then take you to the View Detail screen.
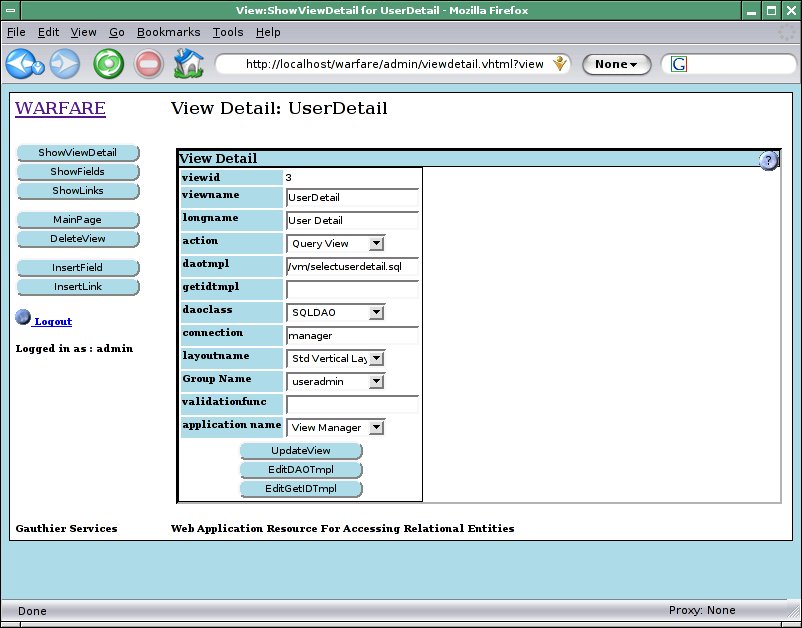
The View Detail screen presents you with a form containing all of the details of the view you are currently maintaining. You can alter the view name which is a short name used mainly to label buttons that link to this view. The long name is made available to the push templates and is used as a more informative descriptive title when displaying the view.
The pull down list of actions enables you to configure what action will be performed and the pulldown list of daoclasses allow you to select which class you will use to access your data. what type of view this is and how it will be processed. The text field labeled daotmpl should reference a filename relative to the WEB-INF/classes directory of your installed webapp or another location on the CLASSPATH. This file should contain the template to be passed to the DAO that will be accessing your data. A convenience method for loading this file into a form for you to edit is available if you click EditDAO.
The getidtmpl also references a file in the same way and can be edited using the EditGetIDTmpl. This file is usually used to contain SQL to obtain the primary key of a newly inserted record. This query should return one row with one field. The name of this field is pulled back into the parameter set and its value is available to subsequent chained views.
The connection field defines which datasource connection should be used to access any data for this view. You can then also select a layout from the Layout pull down menu to customise how this view is displayed. It is also possible to alter the group that owns this with the Group Name pull down menu.
The validationfunc field should specify a JavaScript function call to be called when the form for this view is submitted. e.g. validateThisView(this) which would call the validateThisView function in javascript and pass in the form which has been generated by this view.
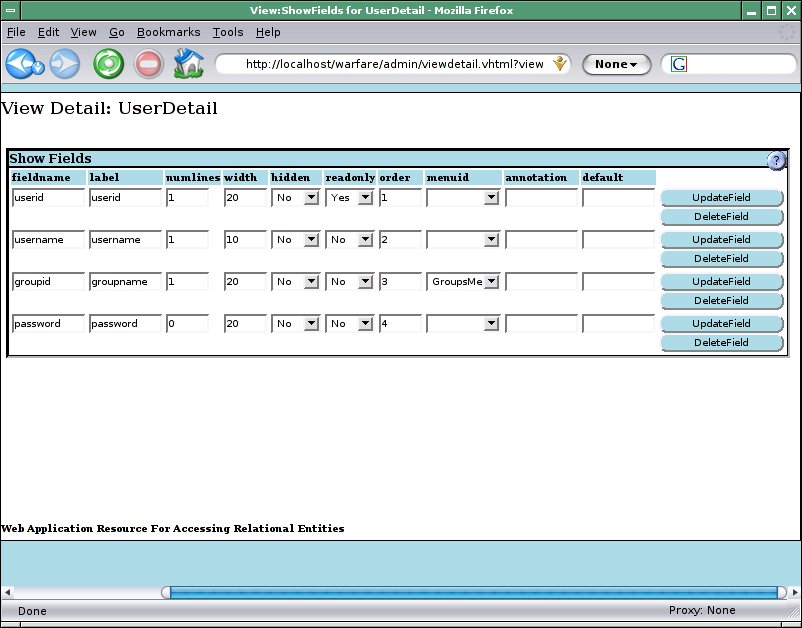
Fields can be configured from the View Detail Screen. Most view types do not need to have fields configured as the framework will by default render fields from a result set as a simple editable text field. If you wish to override this default (i.e. to display a field as read only) you should configure a field. Input views will always require fields to be configured to make use of the standard layouts as there is no results set for the framework to determine what to display.
Clicking on the button on the View Details screen will list all of the fields that have been configured for this view. Clicking on the button will create a new field for you to configure for this view and then display the list of all Fields. The Show Fields screen allows you to alter the name of the field that this configuration applies to and the Label that should be displayed alongside the field. You can also configure the number of lines you want the text box to be (-1 creates the text box as a password field), the width of the text box and also whether the results should be displayed read-only or hidden. You can also pick a pull down menu to be used when displaying this field. Default values for the fields can also be input into this screen.
Once you have configured a field appropriately you should click UpdateField to save the configuration. If you no longer require a field to be configured then you can click the button to remove that field from the view configuration.
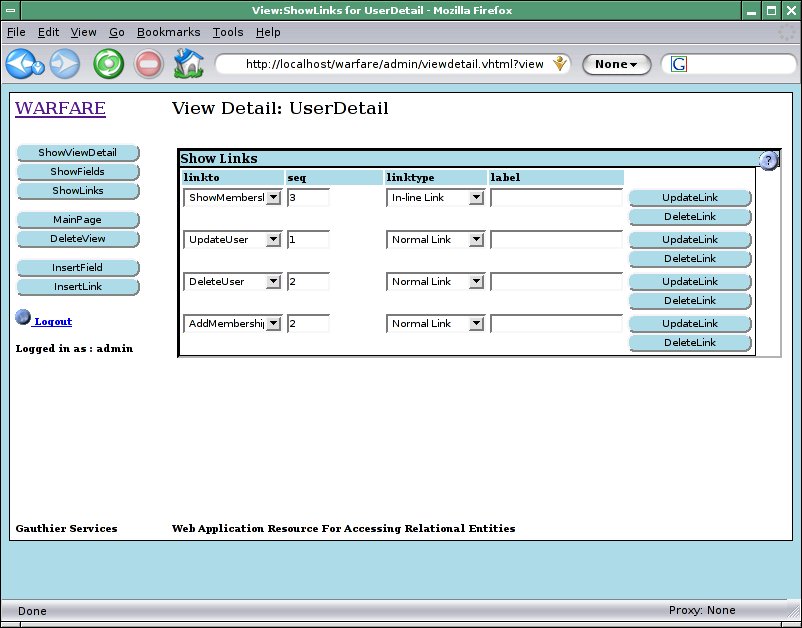
Links are administrated in the same way as Fields,clicking on the button will show any links for this view. Clicking will create a new link and then display the list of all links. The Show Links screen allows you to select from a pull down list the view that this link will link to. The sequence of the view this is primarily used to determine the order of buttons linking views when displayed on screen. Most importantly you can select from a pull down list which type of link you would like this link to be.
A Normal Link will be displayed as a button on screen when displaying this view. When clicked the button will submit the entire contents of this view as input variables to the view that is linked to. This enables you to find related records in another view i.e. to obtain a list of all invoices for a single client when you are looking at a clients record.
An In-Line link performs in a very similar way in that the details from one view are fed as input parameters to the view that is linked to but with an in-line link the results are displayed on the same page instead of rendered on a separate page after clicking a button.
A chained link is completely different in that generally only the input parameters from the current view are passed on to the next view in the chain. Any results from executing the getidtmpl will also be passed. This will also prevent the current view from being displayed unless it fails to process. Only the view at the end of a chain is displayed. An example of using chained views would be to chain a Display Details View after a view which has inserted a record. The getidtmpl can determine the primary key of the record that has just been inserted and pass this onto a query view to retrieve the inserted record and display it for further editing.
Once you have edited the link you are interested in and you are happy with it you can click on UpdateLink to save the changes that you have made. If you would like to discard this link then you can click on DeleteLink to delete the link.
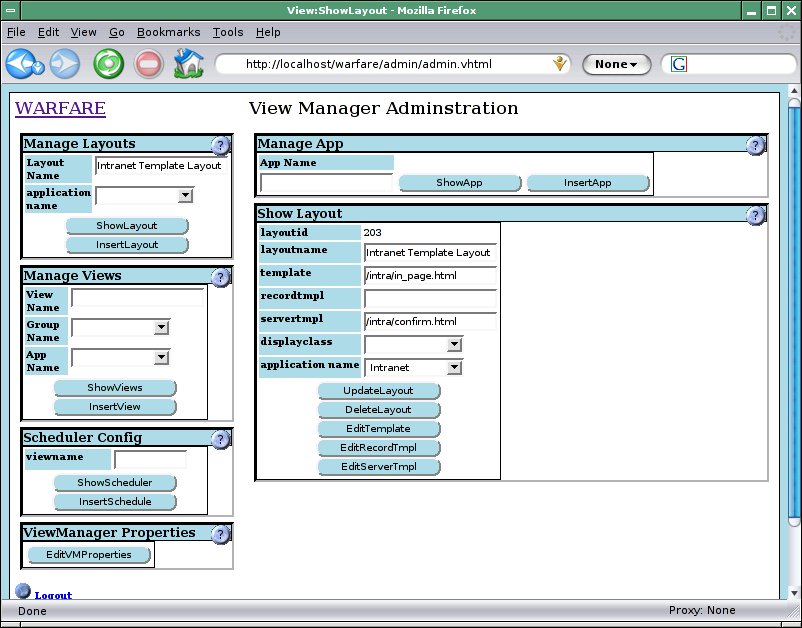
You can search for existing Layouts by entering the LayoutName in the layoutname field on the admin screen you can use % as a wildcard if you are uncertain of the layouts name. Clicking the button will list all Layouts that match your search criteria and allow you to edit them. If you wish to create a new layout then enter the new name for your layout in the Layoutname field on the admin screen and click on InsertLayout.
After searching for a layout or inserting a new layout hopefully one or more layouts will be displayed on screen for you to edit. You can alter the name of the layout here and also change the type of layout that you want this layout to be.
A Horizontal table layout will display all fields in a horizontal orientation across the page with labels across the top of the table multiple records will be repeated down the page. A Vertical table layout will display all fields in a vertically oriented table with labels down the left had side of the page, multiple records will be repeated down the page. A template layout will make use of the recordtmpl template to display each record in the results set or provide an input form. The XML layout will generate an XML representation of the page and if a record template is specified it will be used as an XSLT stylesheet.
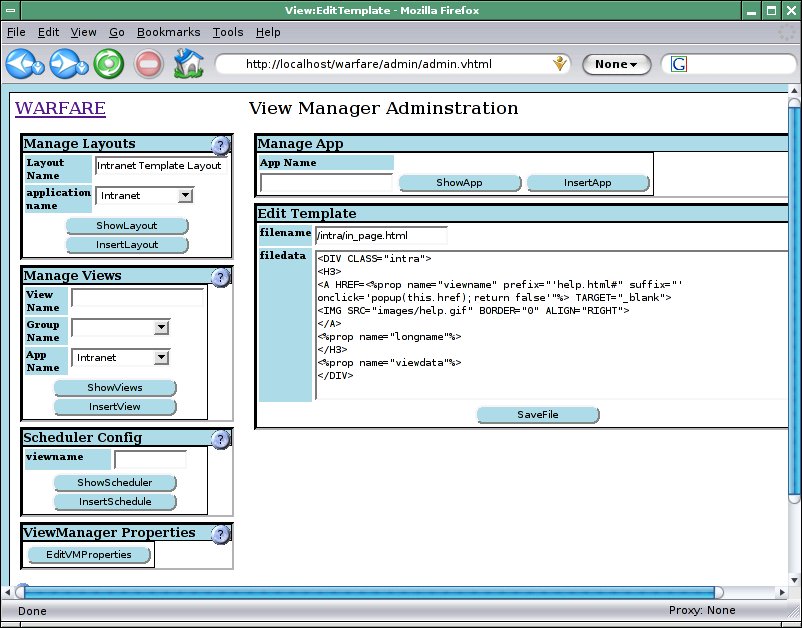
There are three fields to specify templates for each layout. These fields should refer to a file relative to the WEB-INF/classes directory of the web application or another location on the CLASSPATH. There are convenience links to EditTemplate, EditRecordTmpl and EditServerTmpl to load these templates into a form field for editing. The first template is simply a section template to provide the gross layout for a view i.e. to provide a section heading or a border around the view. The recordtmpl is used to provide a template for each record in a results set or for the input view. The servertmpl is used to provide feedback to the user from the server. This is primarily used to provide confirmation of successful updates to a database but is used if an update fails or a select statement from a query view fails or returns no results.
Menus are a special type of view that typicaly contain the word Menu in the view name for easy identification. A menu can be created in exactly the same way as a query view. The results that must be returned from any query must have exactly two fields value and descr. If this menu has the word Menu in the title it will show up in the pull down list when editing fields and can be selected to provide a pull down list for that field.
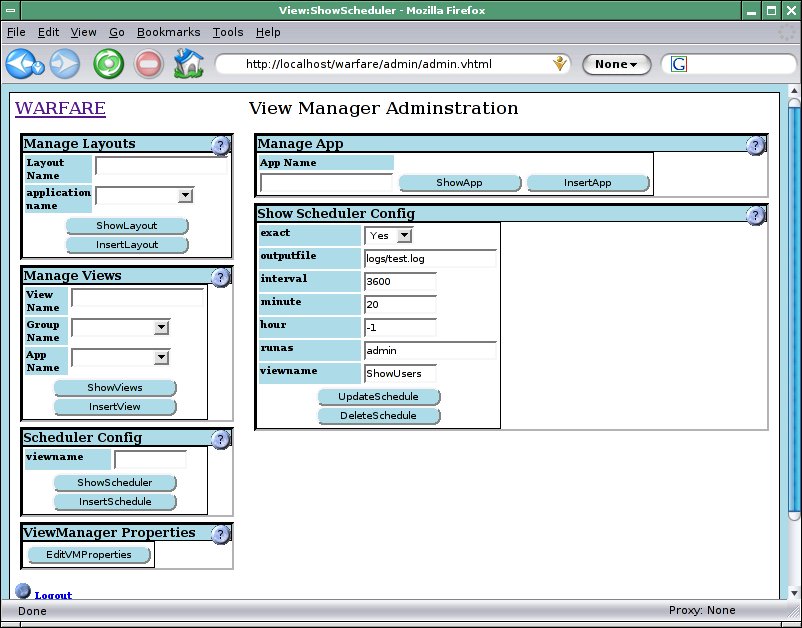
From the main view admin screen you can find scheduled views by view name in the Scheduler Config section by pressing the ShowScheduler button. Entering no search term will list all of the views that have been scheduled. You can also enter the name of a view you would like to schedule for regular execution by pressing the InsertSchedule button.
When editing a scheduled view you can set the view name, the user the view should be run as, the minutes past the hour, the hour and an interval to repeat the extecution in seconds. When specifying the hour a value of -1 can be used to specify no particular hour. The exact field specifies whether the view should be executed at exactly the time specified or if preference should be given to preserving the interval length. The output file will be appened to with the output of the view after each execution.
Templates in their simplest form are simple files containing some specialised tags which will be substituted with values. The specialised tags are differentiated from any other tags that may be present by being enclosed within <% and %>.
The most common tag that is used within all templates is the prop tag. The prop tag takes a number of attributes that determine what is substituted in place of the tag. The first attribute is the name tag which determines which properties value will be used. The prefix attribute specifies a string that will be prefixed to the replaced value. The suffix specifies a string that will be appended to the replaced value.
Example 18. Using the property tag
If the property spam is set to equal 'tin' then <%prop name='spam' prefix='blue ' suffix=' yellow writing'%> will be replaced with 'blue tin yellow writing'.
All templates have some standard properties available to them that can be used. There are some additional properties available only to certain template types.
The properties here are available to most templates as they are generated and fed in from the front end.
- VMUNAME
The name of the user logged into the system.
- VMUID
The numerical user id of the user logged into the system.
- VMGID
The numerical group id of the user logged into the system.
- VMSID
The session id of the current users session. This can be used for tracking users or shopping carts.
- HTML Parameters
Any variable that has been passed in via a POST parameter or a GET parameter will be available.
These properties are generally available to page templates in layouts. The page template is used to provide a consistent wrapper for view presentation.
- viewname
The primary view that has been requested.
- longname
The primary view that has been requested.
- viewdata
The actual data for a view.
- formname
The unique name to be used for forms. This must be used as a name for forms to ensure the linkmode of 'link' will work.
Server templates are used to provide feedback to the user on what a view has performed. In the case of update views they can be used to show how many rows have been updated, the saved values of any inserted records. If any view failed server templates can be used to display any error codes and the SQL that the server attempted to execute.
- exception
The exception that the view threw during execution
Record templates have a whole host of parameters to represent each field that is returned as part of the results set. These properties are accessed for each field by specifying the field followed by a . and the name of the property. You can also position any sub-views using the subview property.
- fieldname.value
The raw value for a field.
- fieldname.hiddenfield
The value for a field as a hidden form field.
- fieldname.field
The value for a field as a form field which will take on any field settings specified in the view manager including menus.
- subview.viewname
A complete sub-view identified by the viewname. Sub-views are generated based on any In-Line links specified in the view manager.
- viewlinks
The buttons to link to any other views that this view has normal links to.
Some additional parameters are available to vhtml templates to incorporate various extra views.
- view.viewname
A complete view identified by the viewname. Views are made available as properties via the import tag.
- view.main
The main view for a page that is usually specified via the View parameter in any POST data to the page.
The import tag simply loads another view into a vhtml template to make it available as a property to the template. It takes one parameter of the viewname to load. This tag is only valid on a vhtml template.
The import tag also has an optional target attribute that can be used to define the target view property to send the results from any form submissions to. The target can be set to anything and will be used to replace appropriate property in the vhtml template. If the target attribute is to be used with template or XML views then care must be taken to store the value as a hidden form field. The default display routines will handle this automaticaly.
In some environments features that are not available from within the WARFARE vhtml templates may be required. To provide for this some additional means of accesing WARFARE Views have been provided.
The ViewImport servlet has been provided as a simple means of including WARFARE views into JSP or other scripted pages.
The View Porlet is a JSR-168 compliant Portlet to provide access to WARFARE views from within a Portal. You should follow your Portal servers instructions for deploying the WARFARE war file as as a portlet. Once deployed you will be able to load the portlet into your portal pages and configure the properties appropriately. The available properties are:
- Help Page/helpPage
A help page within the WARFARE war to display when the portlet help is requested. This can be any page relative to the root of the WARFARE war.
- Default View/defaultView
The default view to display in this portlet instance. If this is not set then a list of input views that the user has permission to access is displayed.
- Respond To/respondTo
The name of the attribute in the PortletSession to retrieve a view from and display. This can be used in conjuction with the sendTo property to allow one instance of a ViewPortlet to receive the output from other portlets views. If this is left blank then the Portlet will only display it's own results. If this is set then sendTo should be set to the same value if subsequent actions within this portlet instance should be displayed within this portlet.
- Send To/sendTo
The name of the attribute in the PortletSession that the results of any actions handled by this Portlet instance will be stored in for subsequent display by another portlet instance which has been configured to respond to this named attribute.
- Enable Reset View/enableReset
Set to true or false, true will enable the Reset View link at the bottom of the portlet to reset the view to the Default View. Setting this to false will hide this option.
You may find that you can't do everything you want to be able to do entirely within the framework provided here. You may want to access data via EJBs or use SOAP or some other arbitrary API. Rather than attempt to cater for all possible methods of accessing data, or displaying data, simple methods for extending the framework to specify new datasources and new display routines has been developed. This prevents the framework from becoming a piece of Bloat-ware that will cost thousands of pounds to deploy, support, maintain and develop.
The model is based on the plug-in principal where you can generate code to extend the View class and package it in a jar file. In order to deploy your plug-in then all you should need to do is place the jar file in the WEB-INF/lib directory or another location on the CLASSPATH. If you are configuring views directly in the database (i.e. not using the view manager) then all you will need to do is set the class name of your plug-in where apropriate and the framework will be able to use it. If you want your new view type to be available to the view manager then the view type will need to be registered in the view manager to make it available in the pull down list.
Generating a plugin that can access or update data from an alternative source is simply a case of implimenting the GenericDAO interface. The GenericDAO interface requires two main methods, one to update the datasource and one to query it. The parameters passed to these methods are a String template that is populated from the template field of the vm_view table and a GenericDTO of parameters that are usually obtained from the form post data.
You will also need to impliment the methods to set the data source and one to close the datasource.
Example 21. The FileDAO Plug-In
 | This is implemented to satisfy the interface only but in other datasources resources that need to be disposed of should be disposed of here. |
 | The datasource name that is passed in from the vm_view table is used to obtain additional parameters required for this DAO, in this case the base directory to output files to. |
 | The filename to output to and the data to output to the file are read from the parameters that have come from the form post data. The data is output to a file and a DataException is thrown if any errors occur writing the file. |
 | The template parameter is used to obtain the value from the posted parameters which represents the file name to read. The data is read from the file and the filename and file data are placed into a GenericDTO which is placed into a results array and returned. |
Registering plug-ins with the View Manager application is a simple matter of inserting a new entry in the vm_lookup table. The new entry should state that it is a dao, specify the class name of the view and assign a name to refer to the dao type in the View Manager application.
Once your plugin is registered within the View Manager Application you will be able to select it from the pull down list for daoclass when you are creating or editing views. Obviously your new class will have to be locatable on the CLASSPATH, within a jar file in WEB-INF/lib or locatable within WEB-INF/classes.
You can also use your new view by specifying the class name directly in the SQL used to insert a view into the ViewManager database if you are developing applications directly without using the view manager. All that is required is that the full class name is specified in the daoclass field in the vm_view table. If you don't register the view as above then if a user modifies the view in the view manager then the view type will be set to null or one of the other registered view types.
Inorder to write a plugin that can be used to display the results of a query you will need to impliment the DisplayableResults interface. The Displayable Results interface requires the implimentation four main methods. One to set the configuration properties which is populated from the contents of the vm_view,vm_layout and vm_field tables, one to set the links, one to set the results and one to display the pagelet. The classes within WARFARE provide a lot of the basic functionality such as reading a page template prior to itterating over the results set therefore extending one of these classes may be easier than implimenting the interface from scratch.
The viewmanager.properties file also requires some global properties to be set. These are the vmconnection property and the linkmode property.
- vmconnection
The connection to use to read all view configuration data. This must correspond to a connection configured later on in the viewmanager.properties file and be a SQL connection.
- linkmode
This setting determines how the form submit buttons are generated in HTML to link between views. There are three possible values:
- input
uses an INPUT TYPE=SUBMIT element that is compatible with all browsers but can't make use of the full length labels.
- button
uses a BUTTON TYPE=SUBMIT element that can make use of the full length labels but has issues within some versions of IE.
- link
uses A HREF="javascript:document.form.submit()" elements and other javascript. This method can make use of the full length labels and should work with most javascript enabled browsers. Care needs to be taken with record templates to ensure that the correct form name is used.